Clearly I'm a bit of a fan of this pattern, it's definitely not the last one I'll be making. I love the SewOverIt new shirt dress pattern, perhaps I'll be able to get as much variety out of that too!
Saturday 27 June 2015
Cami Adaptation Gallery
As promised, you can see below the gallery of Cami shirts and shirt dresses:
Wednesday 24 June 2015
A & A Cami 3: Shirt Pattern
Good day to you all good fellows. I am back once again from another trip away! What was that people say about resting during pregnancy? Ha ha. No, to be fair these trips have been very restful if not a little sore on the hips. I've worked from home again today so I can recover.
So I'm back with the last of the adjustment and alteration posts for the Cami pattern. Last week you saw my Cami-Washi hybrid, and I will do a post to show you all of the different iterations of this pattern so far at some point. I hope it goes to show what can be done with one pattern and a few changes.
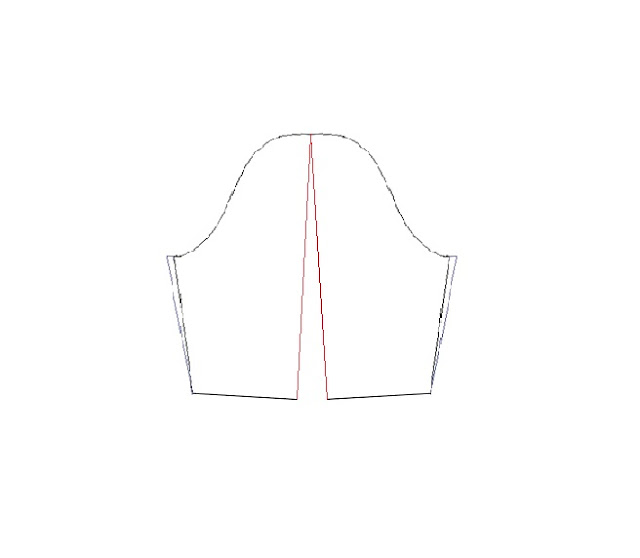
Chronologically, after my last Cami shirt I made the Christmas dress that you can take a nosey at here. The one change that I made to the shirt at this stage was to widen the lower half of the armhole. You may remember that in the last installment of A&A I had extended the armhole, so this now fitted well. However, the width across the arm was still tight, especially in the non-stretch of the navy cotton I had used. Therefore I made the following adjustment to the sleeve pattern,
I began by drawing a straight line down the centre of the sleeve pattern:
I then cut through the sleeve pattern piece, leaving a very small amount of the pattern at the top of the sleeve. This was then used as a pivot point, splitting the sleeve by the amount that I wanted. I ensured that the gap was equal on both sides by measuring the amount from the tip to the base of the split.
I then re-drew the armsleeve, including in these changes, and removing the angle which was caused at the bottom of the sleeve by the pivoting.
This was a speedy fix and probably caused a bit too much at the bottom of the sleeve, especially on the 3/4 sleeve. This may need a little work if I make another longer sleeved version, but it is perfect for the shorter sleeve.
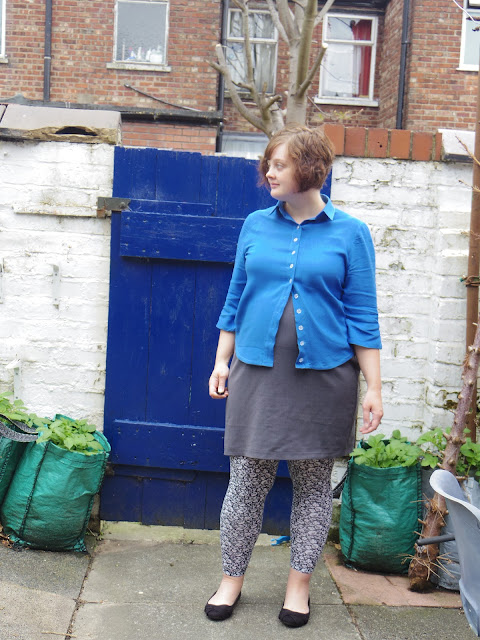
I'm wearing the shirt here with the maternity version of New Look 6128, unfortunately it no longer fits. I think I could make another one with a bit of extra pleating, but I've only got four weeks of work left now so I'm not sure if it would be worth it. I'm very happy with the fit of the shirt, though obviously I can no longer close it ha ha. It works tucked in though, and I have some floaty skirts I can wear with it. I made this in a plain fabric for once which I'm proud of. I didn't even add a quick spot of embroidery to it. Very unlike me!
Cat bombed! You can see that the bottom of the shirt has been shaped more like a shirt than the previous version. I laid a shirt that I had in the drawer over the adapted pattern piece, and traced a new version with a little more room in the hip, and the curve at the bottom of the shirt.
The back of the shirt fits well, though as you can see there are quite a lot of wrinkles in the bottom half of the shirt. I assume this is a sway back issue which needs to be adjusted some more, though maybe it's caused by bump so maybe best to wait before making any changes.
Here's a little picture of bump, though the usual disclaimer applies, I'm bigger now blah blah ha ha.
Labels:
Adaptations,
adjustment,
Blue,
cami,
Cami-hack,
Shirt
Tuesday 16 June 2015
Washi Cami Sixties Inspired Day Dress
Good day to you guys and gals! Hope you're all doing well, the past couple of weeks have been a bit crazy with last minute flights, trips to Birmingham and London, and this weekend we're off to Scotland. Who says pregnant ladies need to relax?!
To be fair I have done myself a bit of damage trying to do too much so am working from home today. I can't tell you how amazing the flexibility of my new job has been, I'm not sure I would have survived this long without it. Though sitting on the comfy seat does seem to make baby want to press his head against my rib.
Did you take part in Me Made May? It's all over now... and has been for a while ha ha! I had a fantastic time this year, and actually made it all the way to the end, which is the best I've ever done out of three years of taking part. You can see my pictures on my instagram account. What normally happens is I'm really enthusiastic at the start and then slowly lose enthusiasm for it all and go silent. But this year I managed to stick to the documentation as well as (generally) wearing a me made item a day. That was my only goal, to stick with it so I'm really happy I managed it. Next year I'll try and take a pic a day, but this year I'm just proud to have finished it. No sweeping statements about what I have learned about my wardrobe for as you can imagine the only thing I learned is that my belly is getting bigger and there's not much I can do about that!
So this dress is another Washi make over ha ha. Once I find something that works, it's very difficult to sway from the path, I jsut make hundreds of the same type of thing until I don't want to make it ever again! In this case it's a good thing though especially as it's important these clothes take me through to the end of my pregnancy. This is a hybrid of the skirt from the Washi by Made by Rae and the bodice of the Cami by Pauline Alice.
I used my fully adjusted Cami bodice that you can read about here. I've still got another post to do for that series, but I've covered all the fitting adjustments now, now I just want to show you all the different versions I've made!
Instead of having the bodice its full length, I scooped the bottom of the bodice pattern to the length of the Washi bodice, following the shaped curve. This means that the bodice is now the right height to accommodate bump.
I then used the back piece of the washi pattern, laying over the cami pattern to create the correct neckline and armholes. To ensure a comfy fit I left off the shirring elastic and replaced with fabric ties. It makes for a bit of a creasy ripply back, but it's so comfy and not everything has to fit to within an inch of its life ey? Ha ha. Oops, just spotted a loose thread on the bottom of this skirt. I don't think I've ever made anything where all threads are well trimmed.
What am I up to?
Have any of you got your tickets for the handmade fair yet? I'm going to be doing a workshop! So excited, some of you may remember that I (and my mum) made masses of flowers for the decorations at my wedding. Learn how at my workshop! http://www.thehandmadefair.com/skill-workshop/yarn-textiles/
Hope I see you there, Debs x
To be fair I have done myself a bit of damage trying to do too much so am working from home today. I can't tell you how amazing the flexibility of my new job has been, I'm not sure I would have survived this long without it. Though sitting on the comfy seat does seem to make baby want to press his head against my rib.
Did you take part in Me Made May? It's all over now... and has been for a while ha ha! I had a fantastic time this year, and actually made it all the way to the end, which is the best I've ever done out of three years of taking part. You can see my pictures on my instagram account. What normally happens is I'm really enthusiastic at the start and then slowly lose enthusiasm for it all and go silent. But this year I managed to stick to the documentation as well as (generally) wearing a me made item a day. That was my only goal, to stick with it so I'm really happy I managed it. Next year I'll try and take a pic a day, but this year I'm just proud to have finished it. No sweeping statements about what I have learned about my wardrobe for as you can imagine the only thing I learned is that my belly is getting bigger and there's not much I can do about that!
So this dress is another Washi make over ha ha. Once I find something that works, it's very difficult to sway from the path, I jsut make hundreds of the same type of thing until I don't want to make it ever again! In this case it's a good thing though especially as it's important these clothes take me through to the end of my pregnancy. This is a hybrid of the skirt from the Washi by Made by Rae and the bodice of the Cami by Pauline Alice.
I used my fully adjusted Cami bodice that you can read about here. I've still got another post to do for that series, but I've covered all the fitting adjustments now, now I just want to show you all the different versions I've made!
Instead of having the bodice its full length, I scooped the bottom of the bodice pattern to the length of the Washi bodice, following the shaped curve. This means that the bodice is now the right height to accommodate bump.
Argh! Giant face! I wanted to include this to show off my collar. Every time I make this, the collar gets a little bit better, I'm still not the neatest sewer, but i'm getting better! Also, just look at that pattern match across the seam! So proud.
I think I managed ti avoid the points on this design falling exactly over my nipples, they are pretty close, but they did have to go somewhere, so I'm not worrying about it too much.
I don't often make clothes that fit well into the bracket of a certain decade, but this is definitely sixties, the design of the fabric, the fit of the skirt and the style all come together to make one heck of a sixties day dress. I feel pulled together and yet comfy, so important with Spud getting bigger. I think I'd like a fleet of these for post-baby clothes so I don't feel slobby when I'm comfy. Not that I can slip into the jeans and top routine as I don't own any jeans ha ha.
Again, these photos are from quite a while ago, so you'll have to take my word on the size of the bump, but it's getting pretty big!
What am I up to?
Have any of you got your tickets for the handmade fair yet? I'm going to be doing a workshop! So excited, some of you may remember that I (and my mum) made masses of flowers for the decorations at my wedding. Learn how at my workshop! http://www.thehandmadefair.com/skill-workshop/yarn-textiles/
Hope I see you there, Debs x
Subscribe to:
Posts (Atom)


