Wednesday 26 September 2012

Not a pillow... not a cushion... but definitely embroidered


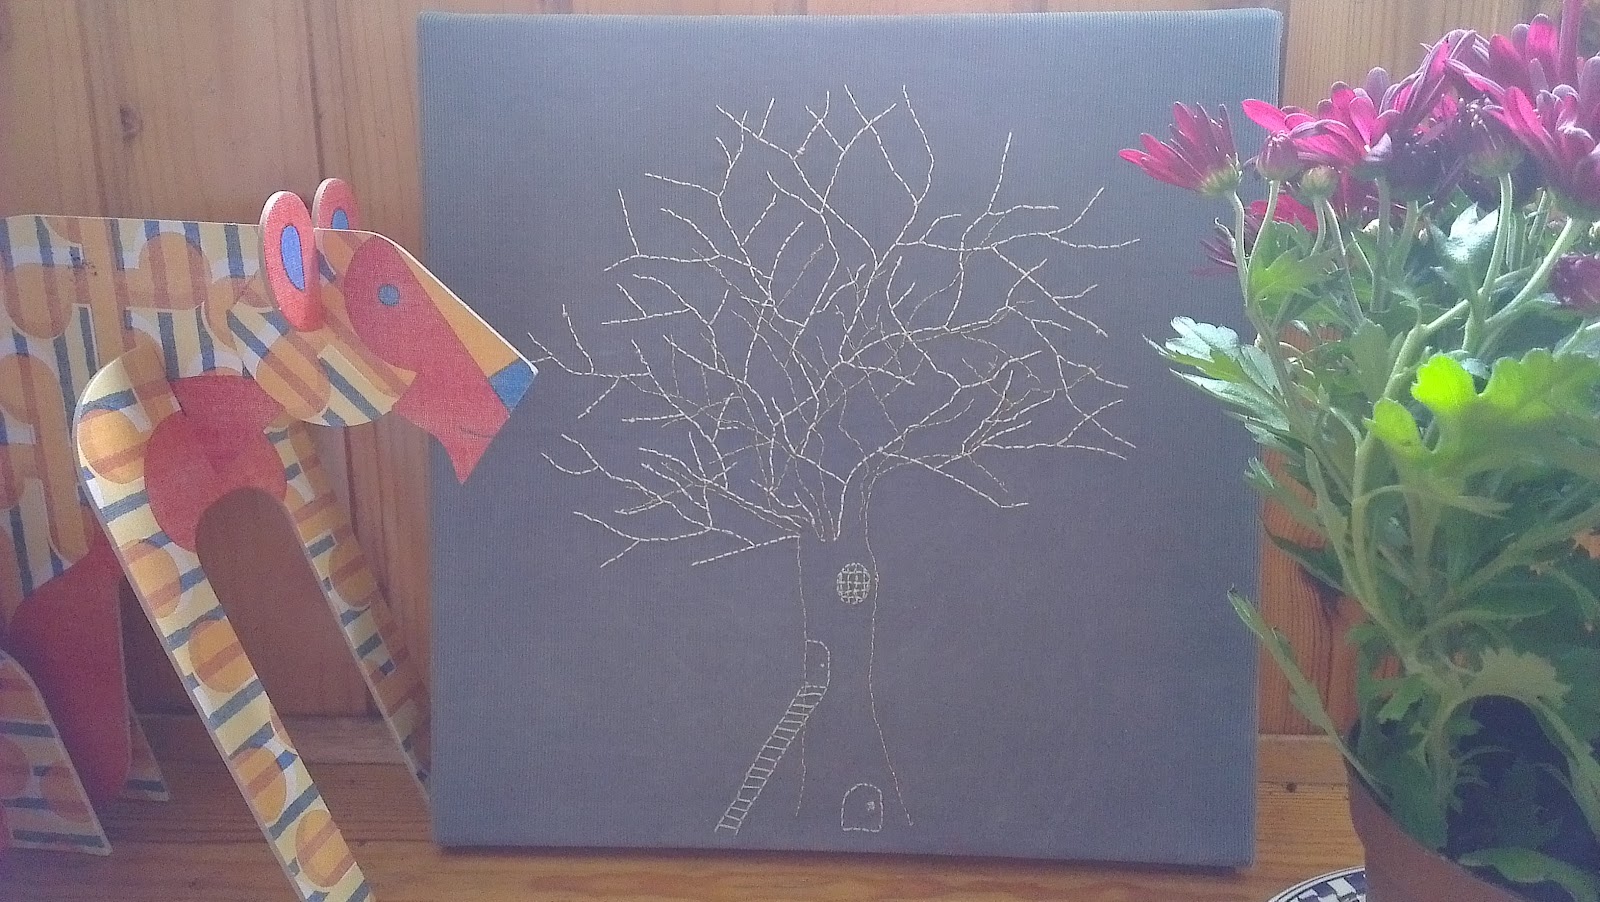
This is quite a picture heavy post, which I suppose is better than a word heavy post, so I'll try and keep the words to a minimum. You can see previous incarnations of this project here and here, and in this one I'm going to show you how I finished off the project once the embroidery was complete (another project finished, hoorah!).

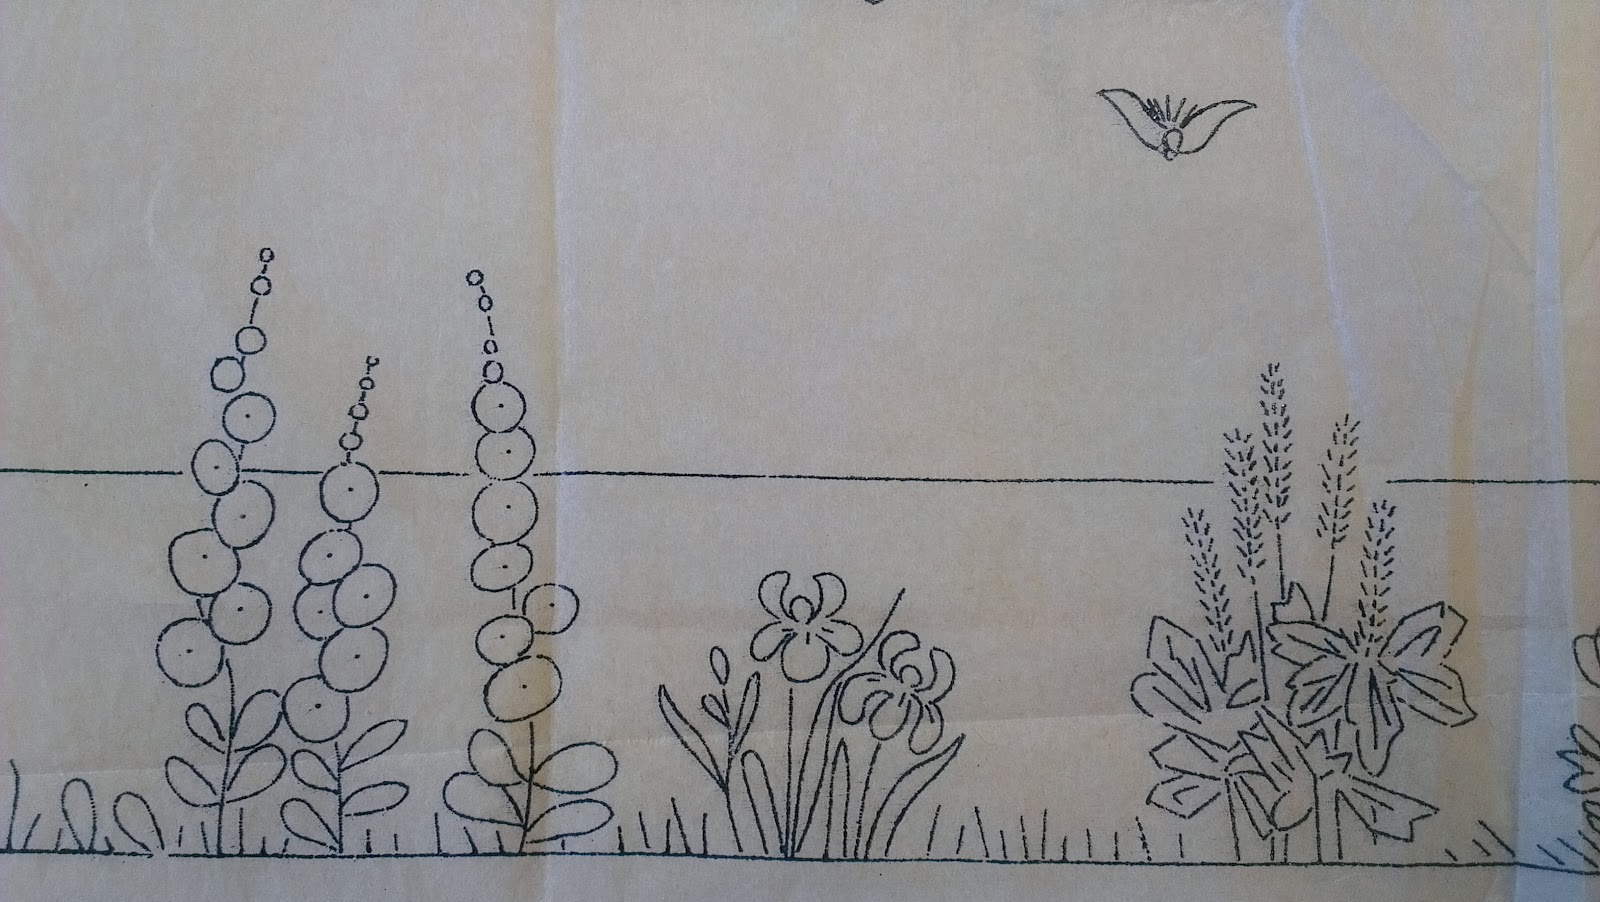
To finish the embroidery I learnt a new stitch, fly stitch which I used to finish the lilac lavender/ reeds (?). I used these instructions, and it seemed very similar to detached chain.


The rest  of the embroidery was finished using a combination of detached chain, lazy daisy, french knots and backstitch. If you'd like a more in depth list of how to do this pattern, (and perhaps a scan of the pattern itself) please let me know and I will do a more developed post.

To finish the cushion, I started by trimming off all the edges with my new toy rotary cutter. I then pressed in the sides, giving 3/4" of border around the outside, pressing the bottom edge first, and matching the top layer to this.


To press in the corner, fold in the corner of the edge down to your pressed crease on the inside. Press the original crease again, with the triangle on the inside. Like this:


I then sewed in the pom pom edging I posted about here, between the two layers using my zipper foot:
Once I had a basic layer for decoration, I got out all the bits and pieces of trim from my stash that went well with the pompom trim/ embroidery. I laid these onto the cushion to give me a starting point.
I then attached all trims which would be treated as one. Such as:

 In order to make the plait as above, I stitched the three ribbons together with the machine, leaving the needle in. I then plaited from this point, stitching the other end together when complete.
 
 I then stitched the layers on in stages, one ribbon at a time, beginning with the layers on the bottom, and finishing with those on top (as you'd imagine). This was quite complicated, as I tried very hard to only stitch through one layer of fabric. This meant that I had to resort to hand stitching for some elements.

This is the finished project, what do you think? Should have taken the pics in daylight really, apparentl 7.30am doesn't constitute daylight anymore.


Deborah


Sunday 23 September 2012

Burnt Orange Pencil Skirt

I finished something! Hoorah! And here's a picture of our kitchen (which only fits one person) actually looking quite clean for once. I think I could give The Little Paris Kitchen a run for its money.

Out of my entire giant list of things for last weekend, I feel I did very well by actually completing a project and not getting distracted, attempting to do four and achieving nothing.

However, I did only finish one project, but it was totally worth it. I made a burnt orange pencil skirt for the winter, and it fits both my waist and hips. Something I have never found in the shops, even when I was teeny tiny. I'm really starting to believe I can sew clothes.

I always used to give it a go, but never paid very much attention to the pattern, or ironed anything, so it was never quite as pristeen as I would like it. The sizing would be out, or I'd have made something up ad hoc and it would go wrong.

Not that I haven't done that in this project... but I'm getting better at it maybe? As you can see in this post, the skirt is a remake of a remake, a hack job I did on a skirt that was several sizes too big. I unpicked all the side seams and recut the pieces from my pattern.

Something to do with me leaving the back zip in instead of re-doing it meant that the waistband fell just short of the right size, so I bound the raw edge with navy bias binding. I think I got away with it, just. But now I know when I make the pattern from fresh that I might add another inch to the waistband just in case.


I also made belt loops, which came together very quickly and easily. Unfortunately when I was stitching them into the waistband, it seems to have pulled the waistband closer together (I should probably have basted alot more?), if you've got any tips on how to avoid this in future then please let me know!

I added in tartan panels for the pocket pieces to add contrast (and because I ran out of material) and added in the belt loops in tartan to keep up the theme.


When I did the top stitching on the pockets, I did it in navy to tie in with the pockets.

I learnt something new on this project too, understitching. When I read the description of what this was on the pattern, as usual, it all sounded complete gobble di gook, so I looked up understitching on google, and what should come up but the lovely Colette of Colette Patterns. Her instructions here, were clear and easy to follow with pictures (v. important to a person like me who gets all those words confused in their head). I was very pleased with the results, this makes the fabric not roll out revealing the navy lining.

Overall, this pattern worked really well. It was easy to follow, and fit me to the dimensions that it said on the packet (not always something that actually happens). I'm still learning, but feel like I really made progress with this, and haven't stopped wearing it since it was made! Any projects you're particularly proud of at the moment?

Deborah

Thursday 20 September 2012

September success


The September weekend was a success! I finished a whole skirt, very proud of myself for actually finishing a project. And I'm itching to share it with you, but unfortunately Mr T took the final pictures with his camera, so I’ll have to wait until he has a second to put them on the laptop.

In the meantime here’s a sneaky peek. This picture makes it look like I play guitar... in fact I'm far too lazy for all that learning... I took the guitar off Mr T so he could take the picture, obviously wasn't paying enough attention to put it down again.


I also attached the embroidery below (which I finished ages ago) onto a canvas. The little art shop in Stockbridge is having a sale on canvas, and it occurred to me that this was the perfect forum for my embroideries. These usually hang around folded up in a ‘to be completed’ pile because I can never decide what to make them into when they’re done. But I’m really happy with how this came out, and think I’ll do it again with any new embroideries.  

It’s easy to do, I used metal drawing pins, pulling the fabric tight over the canvas and hammering it in at the centre of all four sides. I folded the excess fabric at the corners over, and hammered that in place. Then I added in pins wherever it looked like the fabric was loose. Ill try and take pictures the next time I do it. I was sorely tempted to buy a heavy duty stapler for the occasion (something I’ve wanted for ages) but resisted temptation (for once), sticking with the drawing pins I already had in the cupboard.

Saturday 15 September 2012

September Weekend Projects

Working for the Council has some benefits, the best of which is the Midlothian September weekend. I have a four day weekend to play with, and for the first time (probably since we moved up) we don't have visitors!


The original plan was to make a practise version of my wedding dress (above left), but with the prices of fabric up in Edinburgh, and the amount of fabric needed for my first draft pattern V1094, I decided to get a pattern with a little less fabric. So I chose New Look 6723, and a beautiful vintage wallpaper-esque navy blue fabric. I think I need the most practise on the bodice, so went for a basic one to start with, to work my way up. I'll keep you posted with progress on this one.

The project I've first started is a re-working of the orange skirt (in the centre of this picture), when I first bought this skirt it was a number of sizes too big for me. So I did my usual job of taking it apart and adding a couple of pleats. It sort of fit, but having lost a little weight over the summer, it has just become unwearable. So I've gone back to basics, taking all the seams apart, and making the pattern pieces from New Look 6128. I ran out of fabric to do the waistline, so I've added in some dark green and blue tartan as the pocket pieces, adding some contrast. I think it works, but will have to wait and see if I wear it when it's finished.


You've seen a variety of pictures of my flower embroidery, and I'm coming to the end of finishing it. So I bought some teal pom pom trim (my favourite kind of trim) and I'm going to add it to the edge of the pillow/ cushion to make it slightly more cushion looking (hopefully). Also, Im thinking it needs something a little more in the main area of the cushion, feels a litte white to me. I've got some plans for how to fill this in... watch this space!

Obviously I have taken on way more than I can do in this weekend, but it's quite nice to have exciting plans ahead. Ill update you soon with my progress!


Deborah

Tuesday 11 September 2012

Great Granny Greens and pre-nostalgia


I had a fantastic evening with Granny Greens last night, and I'm super proud of everyone for getting their fancy french knots done. Saw some beautiful inspiration, and some old friends!

I hope everyone who came along had as much fun as me, and I'm looking forward to you bringing your embroideries along to Granny Greens next week.

Last night made me feel a little bit pre-nostalgic, I'm going to miss you Edinburgh! So on the way home, in the drizzling rain which didn't appear to touch me at all (see, the rose-tinted haze has already come down). I took this picture of the lovely night lights over Dean Bridge, one of my favourite views of Edinburgh.

Friday 7 September 2012

Embroidery Workshop


I'm running an embroidery workshop on Monday 10th September for my co-organised craft group Granny Greens. It will be a beginners course, providing all the knowledge you need to be a whizz bang freehand embroiderer.

I'll be providing my knowledge, and the knowledge of wiser others for the teeny tiny fee of £1.50 for materials! For some great hints and tips before you get there, check out Wild Olive . There are some lovely illustrations in this series of posts, which are very simple, colourful and easy to follow.

I'm buzzing with ideas for the workshop, and would love to hear yours so get in touch! @DFabricate or leave a comment below.

For more details on the workshop, or what we do at Granny Greens click here.

Hope to see you there! Deborah


Wednesday 5 September 2012

The Night Circus

I very recently read The Night Circus by Erin Morgenstern. It was a fantastic read that I thoroughly recommend. It's so rich in fantastically imaginative imagery which I found very inspiring. This novel really demonstrates how a novel can depict intricate and expansive landscapes, which is one of my favourite aspects to a novel.

When sat in work, attempting to divert my mind from work based things, I couldn't help but draw a circus tent as I daydeamed about running away to the night circus and becoming a trapeze artist (not that this is physically or mentally possible), then I had to add a carousel... and a slide... and the pencil drawing is what I ended up with numerous meeting minutes later.


I then coloured it black and white as per the circus colour scheme, I love the strength of the black and white, I may make this into an embroidery in the future, perhaps on black fabric in white? Let me know what you think. Also,what doodles have you drawn that looking back, you're actually quite proud of?

Deborah

Monday 3 September 2012

Embroidery bonanza

For my birthday this year, I received some beautiful vintage embroidery transfers from Mr T's mum. Having just started up properly with embroidery, I'm really exciting about practising some techniques, and finding some new ones to fill in the gaps in these lovely patterns. I've got four plain cotton pillow cases (I call them pillow cases but they're actually too big to be cushions and too small to be pillows) to decorate, and so I've chosen the following pattern:

 They are far too chintzy for Mr T's taste, but as usual I'm sure he'll suffer in silence. I'll try and include some dark red, and some navy, that should keep him happy.

So, in order to copy over the pattern, as I didnt want to damage the pattern anymore than necessary (some of the transfer is starting to peel away, leaving little black spots all over my desk.) I just laid the pattern under the top layer of cotton, and traced it over in my trusty wash away pen. And I ended up with this!

Those with good vision might spot the failure of a bird with a big cross through it on the right, I do want to add some birds/ bees around the flowers, but will try and find a better pattern elsewhere as the birds on this pattern look a little odd.

Having traced over the pattern very roughly I then filled in the detail freehand. I'm very happy with how it came out... but we'll just have to wait and see what kinds of stitches I might need. Let me know if you have any suggestions.

Deborah


Sunday 2 September 2012

Picnic blanket skirt


Over the summer I made the tilly and the buttons picnic blanket skirt.

I first made it in a mustard yellow wool mix but the fabric was a little heavy, making the gathering a nightmare and the skirt look a bit big. I'll still wear it but wanted to give the pattern another shot in a lighter fabric. So I decided to make it from a lightweight john lewis cotton, lined with anti-static (because I wear tights so often).


It was a great success and I haven't stopped wearing it since it was finished! As you can see from the pic, I didn't have anything that went with it, but that was just a good excuse to go shopping.

I would really recommend this pattern for those people who are fairly new to sewing but understand the basics, and are looking for the next step up. The instructions are well illustrated and easy to understand and there are no pattern pieces to contend with. Let me know if you give this pattern a go!

You can find the pattern here:


Deborah

LinkWithin

Related Posts Plugin for WordPress, Blogger...