Monday 8 November 2010

Handbags for Magpie Market

 To continue my line of similar materials and colours, I began last week to attempt ten handbags in a week. Then I realised I had only the material for five. Also I had a job for five days, so unfortunately I utterly failed in that respect.


But I am unemployed again! So here is what I managed to achieve up to Sunday night. 

The hardest part of this I always find is matching up the materials, I tend to lie them all out and just stare at them for a while feeling a little lost. After about ten minutes I came up with the groupings above. The colours don't stand out quite as well in these photos but you get the general idea.


I then cut out the materials to exactly the same shape as each piece. I find that no matter how accurate I try to be I always find my pieces are each a little different.


And after some sewing, and swapping of threads etc, this is the finished product! I haven't done the straps as of yet, that's a job for today. I will post again when they are finished.

Monday 1 November 2010

October Crafts Complete!

I have now finished all the brooches necessary for my stall in two weeks. I chose these colours and fabrics with winter in mind. 

I have decided to try and keep these colours and fabrics as a range through my entire line. I am now going to make some handbags for the magpie makers market in similar colours, and with the textures in mind. I need to create some ideas for applique, embroidery or simple decoration for these bags, and perhaps to carry through to a range of cushions.
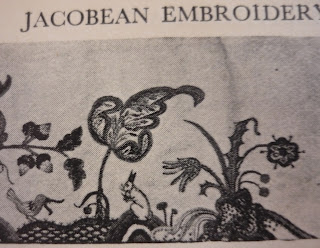
Here are some pictures of historic embroidery techniques I found in my Great Aunts embroidery book:


I'm trying to narrow down my ideas, and augment them. But so far I like the floral mortifs over others. I have previously used the trees as an embroidery, and it was very effectoive. I will put in some photos soon of my decisions on the embroidery.


This is the eventual decoration of my summer stall, and I think it needs quite a bit of work. Much more levels, plus the space for all of the brooches I have now made. If anyone has any ideas for improvements please don't hesitate to let me know.

Tuesday 26 October 2010

Winter Beginnings

 With Winter drawing in and lots of stalls in my new City set up, it's time for new bloggings! I have lots of time on my hands due to my newly unemployed status. So I have begun the process of starting a new line for my stalls.

With the success of my flower broaches and hair bands in the summer Manchester stall, I decided to begin there.

I chose soft cords and felts, mixed with a tiny bit of tartan. I didn't want to use too much tartan. My dad may be from Glasgow but I'm not a true Scot just yet. I made these all in a mix of autumnal/ winter colours to hopefully last through the winter. I found one of the problems with my line in August was everything was a little too summery, as everyone was looking towards the autumn. I hopefully will be prepared now for the full season.

So over the past week I made ten of my most popular flower style, as I had done previously. However, I soon realised that as one of my first problems was too little stock, I decided to upscale.

So I created a production line and have now cut out somewhere around 480 petals. Pretty intense. I'll post up some pictures when they are all made up.


I made this head to display these flowers. I papier-mâchéd a polystyrene head with cream paper with tiny white flowers. It didn't come out so well in these photos, but the cream works well with the warm colours in the flowers.

I'll post some more pictures of the finished product soon, and if any of you are creating a line for your own stall, and have any display ideas you'd like to share. Let me know!


Monday 7 June 2010


It's raining again in Manchester, but the plants seem to like it so I'm not complaining. Just wish I could find a time consuming job now to get me out of the house. I've been trying to make the most of my time though and have another quick tutorial / explanation of my bedroom to offer.

I originally had bought one piece of fabric to cover my bed sheets for the bedroom. It was lime green and black and stripey and I was kind of confused about the whether I liked it or not. But I went ahead and stuck it on there anyway because I'd bought it so I kind of forced myself into it. I then came to realise it was boring and quite ugly.

So! I embarked on a new mission, to create something much nicer, and more in keeping with the room and my new curtains. To tie in these (slightly wintry) curtains with the bedcovers was a little bit of a challenge, especially as summer is now on its way and I wanted something light to keep the room bright. I went for green to contrast with the brown and green in the curtains and decided to use applique because I could use a variety of fabrics mixing colours and textures to mtch any season.

I chose the shape for the applique by copying the weird cabbage shapes from the curtain. I didn't want the shapes to be too small because I'd be sewing all day.


So! I drew out the pattern I wanted on some baking paper, which is just as good as tracing paper and much easier to get hold of. I cut the pattern out and used it as a pattern for the applique.

To decide on fabrics I pulled a few out of my hoard and threw them all together in a pile. This is a very easy way to work out what fabrics work together. Just stick to the basic principles and don't worry about using contrasts and different materials.

Once each piece was cut out, two of each fabric. I then pinned all the pieces together, deciding to put the floral shapes into groups of three as in the design on the curtains.

The most difficult part of this was sewing the pieces on, I sewed around the outside of all three and then around the centre. You do have to sort of wrap yourself in sheeting to make sure you only sew through one layer of fabric, and it hurts your arms after a while but it doesn't take long. I used a zig-zag stitch on its widest setting. This is the final result, a very cheap and easy way to brighten up the bedroom.

Monday 10 May 2010

The Garden


What with the rain just about making a come back to Manchester, this is an odd time to write my garden blog. However, nothing makes you stop gardening and start writing about it than rain.

There are a few easy mistakes to make with plants, and filling a blank space like a balcony or yard from scratch can be a little bit over-facing. But if you stick to a couple of rules and add a bit of yourself into the mix then you can end up with something beautiful that is completely your own.

I started by sowing some seeds. I got loads of seed packets early on in the year from Aldi. Seeds are available most of the year from the B&Q website. Please make sure you check the back of the packet that you still have time to sow. If it's a little late then buy yourself a couple of young pots, or some plug plants. The Manchester spring market in St Ann's Square is a great place to start.

Other options are the internet; the b & q website , and Gardener's World should have some good links if you think your info is lacking.


Plant pots

To sow, first you need some planters. You can use anything that will hold enough water and some soil. I went on a bit of a hunt in my mums attic and found a couple of things to do this with. The best of the bunch was a red bucket from the beach and an old basket my cousin gave to me a long time ago. For the red bucket I hammered three holes in the bottom for drainage. The basket I lined with an old compost bag and put some holes in the liner.

I also stole loads of pots off my mum, if you have a family member who is a keen gardener then they should already have a mass of plant pots in the shed. To make these a little more exciting I stole an idea form a gardening book. I found some old paint in the garage and decided to have a go. I went with the colours I could find but they all seemed to match up quite well. Using the colours in blocks and contrast seemed quite effective.


Sowing seeds

Very basic this one, just follow the instructions on the packet for they know best. If you've only got a small space then sow about twice as many seeds as you'll need because only about half will survive the seed process.

Score a groove in the soil to the depth required and sprinkle the seeds from about 20cm away thus insuring the seeds are evenly spread. Remember to cover the seedlings in cling film and keep them indoors until they germinate (begin to grow stems and leaves).

Once the plants have grown their true leaves you need to move them into larger pots. The true leaves of a plant are usually different to the leaves of the original seedling. These are usually round and flattish, so when new ones appear that are slightly different these are the true leaves. Remember to water everything really thoroughly once its planted, seeds or plants alike both need loads of water when first planted.

So you should now have quite a few plants that need re-potting into planters. If you are planting in a large pot then try and think about the height and size of your finished plant. You don't want tiny flowers to be hidden by massive leaves and you don't want your tallest plants at the front of the container so they fall down. Very simple but I usually forget this part and have to replant everything again. Well worth giving it a bit of thought. For example, climbers should go at the back of your container so that you can push them up against a wall to train them on.


Knitted Climber

For this I came up with the knitted climber. I started with some very large 20mm needles and some white piping cord. I deliberated for ages over what wouldn't rot in the very rainy Manchester and therefore started with polyester piping cord. However, I soon realised I was using up all my piping cord and that acrylic wool would be just as hardy. I cast on about 16 stitches and then just knit as many rows as it took to get as tall as I wanted.


Labels

These can be quite important especially if you're just starting out. Helping you remember when they've grown what the plant is and how to look after it. I first made some labels out of some card with some pens. Obviously these labels then melted when I watered the plants. Here's a much more permanent version.

I used an old Cath Kidston plastic make up bag that I chopped up into small rectangles. I used some permanent gold and white pens to write the name of the plant on the label. I then punched a hole in the label and using pieces of wool I tied it to my plants.


The End

And this is the finished product so far. I'll keep you updated as it grows, but I'm quite pleased with the results so far. Although I think I started my tomatoes a bit late because they are still tiny. Never mind.

Also, please ignore my neighbours drying sheets.

I am truly a novice at gardening and am quite proud of what I have achieved. But if you think there's something I've missed or there's something interesting you've done with your own garden, please let me know.

Monday 12 April 2010

One Room At A Time


I am making an attempt to create all those finishing touches which I hope will make this flat more homely. One room at a time.

I started last week by making the second curtain for my bedroom window. Every time I have previously attempted curtains, once I finish one side of the curtain I get bored and leave the other side bare. Thus I leave my boyfriend to the perpetual torment of having half blackout and half full daylight streaming in through the bedroom window. I have however now completed one full set.


The fabric is a dark brown with what look to me like those decorative cabbages you can get in a floral bouquet. The effect is quite nice; a heavy fabric that hangs rather dramatically in my plain room. These cabbage things I have carried on through the decoration of the rest of the room, I will post about that another time. But first...

A few tips for making curtains:

Gathers:
  • With heavy curtaining fabrics, gathers look a little bit rubbish. You need lots of fabric so that it falls and looks heavy when you pull them closed, but if you're using a conventional 3" curtain tape do not gather the fabric at the top. It creates an ugly appearance where the top looks really small in comparison to the bottom which hangs flat instead of billowing like it should. It gives the effect of having a skirt hanging over your window. Not good.
  • When using light silky fabrics absolutely gather with the small pleats on 3" curtain tape, it looks lovely and creates an extra dimension to a soft fabric.

Blocking out light:
My boyfriend is obsessed with having a completely dark bedroom for going to sleep. So when I replaced the (half) curtain that I first made for the room I decided to be good to him and buy blackout lining.

However effective these are however, I'm not entirely convinced its entirely worth the £4.50 per metre in comparison to about £1 per metre. No matter how clever you are, shafts of light are always going to come through the sides, top and bottom of the curtain and if you have magnolia walls, (like everyone who lives in a rented flat in the British Isles does) the light bounces off all the walls making it just about as light as it would be with conventional lining. Especially as the fabric itself is very heavy anyway. Obviously its completely different with soft curtains but even then the heaviness of the blackout lining would pull on the light fabric ruining the soft effect.

Measurements and Lengths:
I have one plea to make to anyone out there who is out to buy curtain fabrics. Please take as much information as possible, maybe a photo of your room, an idea of the colour your looking for. You dont have to be strict on this it just gives the person on the other side of the counter an idea what to show you so you dont spend all day looking at every colour in the spectrum.

Measure everything! The length and width of your window frame, the length and width of your desired curtains. And the width of your curtain rail. You cannot have too many measurements but you can absolutely have too few. It will save you alot of hassle and money in the long run if you don't have to keep coming back to the shop with measurements, or if you buy the wrong amount.

Generally you need about twice the width of the curtain rail and an extra 9" or 23cm for hems.


Making Up:
When making the curtains remember that although most curtain linings are slightly smaller to allow for the turnover on the sides, some are not. This I found to my own detriment and had to sit and unpick 2 1/2 metres of curtaining apart.

When shortening the width of the lining, you need it to be about 2" less than the curtain width on either side. This should mean you won't see the lining of the curtain at all.

After that its pretty simple
  • Sew a bottom hem on the lining
  • Put the right side of the lining against the right side of the curtain and sew down each side.
  • Press the curtain and the hems apart, so the turnover on the sides is fairly equal and then sew the top together.
  • Turn out, press and attach curtain heading tape to the lined white side, leaving the strings free on one side if you are gathering.
Next time I make some curtains I will add a step by step picture book of these instructions.

My last tip, although you have hemmed the lining in advance don't hem the bottom edge of the curtain until you hang them up. Hang both curtains next to each other, figure out what length you want now that you can see it and then either pin, take down and machine sew or leave hanging up sit on the floor and hand stitch.

The sit on the floor method was my preferred one, mostly because it's very hard for a small person like me to keep lifting a heavy pair of curtains and hoop plastic curtain hooks that are about a metre above your head.

I hope this has been useful, and I will be posting again soon! Please let me know if this helps or if you manage to make any curtains, or if you have any comments.

LinkWithin

Related Posts Plugin for WordPress, Blogger...